Want to delve into surround sound recording? Marco Solorio of OneRiver Media takes you through some low-cost options to help you achieve just that. You may be surprised how affordable some of these tools actually are. And with more and more devices and platforms supporting surround sound formats, you can increase the value of your viewership experience.
With the onset of a new nature-based 4K UHD series we’re producing, we knew going into it there would be no question we wanted to acquire multi-channel surround sound. Specifically speaking, 5.0 physical microphone acquisition to a 5.1 mix (with the “.1” LFE subwoofer channel derived as a low-pass filter from the 5.0 center channel, a common practice in surround sound acquisition).
Rather than renting expensive equipment, I knew I needed to purchase gear that would allow me to use proper equipment any time I would need to use it. My friends at B&H Photo Video reached out to me on my thoughts about this process and figured this would make an informative article! A large part of the production of our up-coming nature series includes locations that are not only out of town, but out of state, and even out of the country. Renting gear would prove to be just too costly for this and in some cases, not available in some remote locations in the countries we’re traveling to.
Heads Up
One thing to note, this article is NOT in similarity to VR sound acquisition (known as “ambisonic recording”), which is a completely different setup, approach, workflow, and delivery function. This article is strictly in regards to traditional 5.1 surround sound recording and playback.The Recording Hardware
So at the core level, what kind of gear did I need to acquire to accomplish the task at hand? At the start, I needed a muti-track recording device that could record at least 6 discrete tracks; left, center, right, surround left, surround right, and if I felt inclined, the sixth channel as a dedicated LFE (Low Frequency Effects) subwoofer channel. Although I already had a Tascam DR-680 in my audio arsenal (a device I give high marks and is low cost itself), I wanted something that had a little more flexibility, control, and features.The simple answer is to use Sound Devices products, like the Sound Devices 788T 8-Channel Recorder, the clear industry leader in high-end audio recording equipment. But that unit alone is a staggering $6849. As mentioned, I wanted to keep things relatively low cost since I was to buy all these gear out-of-pocket. The clear answer to me was the Zoom F8 digital multi-track recorder at $995.
There were several key reasons I wanted to introduce the Zoom F8 into the audio chain:
- Eight XLR/TRS combo jacks with switchable 24/48 volt phantom power per channel.
- Large headroom, wide dynamic range, and low noise floor.
- Adjustable limiter for each channel.
- Dual SDXC slots (one serves as a backup).
- Ability to record up to 24-bit 192kHz resolution on all tracks if needed.
- Timecode in/out with various TC formats with ability to select frame-rates from 23.976 to 30.
- Wireless control and feedback via iPhone or iPad using Bluetooth.
- Compact size for remote international travel and hiking.
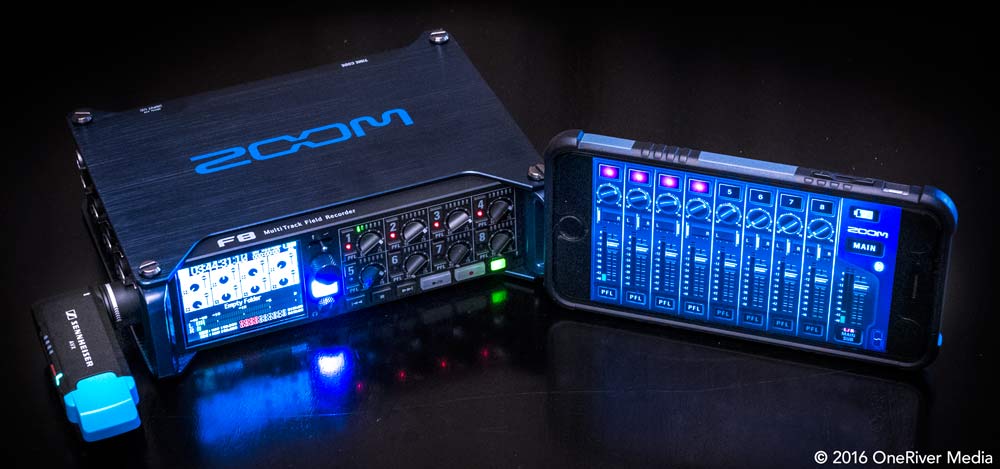
The Zoom F8 sitting next to the iPhone 6 Plus, set up for wireless control and feedback.
Quite frankly, I’m amazed how much technology is squeezed into this tiny device. Most photos make the Zoom F8 look larger than it really is (including Zoom’s own product photos), when in reality, the F8 is very small. Shockingly small, actually. I honestly feel the Zoom F8 is one of the most innovative production products to date, where functionality, quality, and ease-of-use aren’t sacrificed by being in such a compact, yet strong enclosure. By all accounts, the Zoom F8 is a grand slam.
I added the Porta Brace AR-Z8 Case to protect and carry the Zoom F8. It’s designed specifically for the F8 and fits like a glove. It has added pockets and pouches to carry other accessories (wireless lav receivers, excess cable run, etc.). Like all Porta Brace cases, they are individually handmade of high quality in Vermont. Highly recommended.
The Microphones
So with the multi-track recording device figured out, the next major piece of the puzzle were the microphones themselves. I should note that I’ve been knee deep on the audio side of things for decades. I started as a sound engineer in the early 1990’s and dedicated audio control rooms and booths have been a part of OneRiver Media since the beginning. With that in mind, I’ve always had a love for various microphones from the über exotic to your basic vanilla Shure SM-57.For this setup, I wanted affordable condenser microphones that would give me clarity, sensitivity, directionality (to help avoid potential phasing and spill-over), some amount of decent SPL (sound pressure level), and a decent build quality.
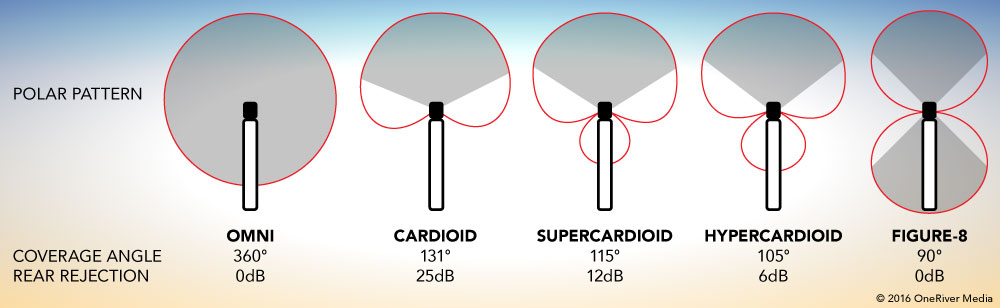
Generalized example of various microphone polar patterns. Note these are general values, as each manufacturer’s microphone polar patterns and rejection field vary.
One idea was to use an actual surround sound module, like the Holophone H2-PRO 5.1 Surround Sound Recording Microphone or the lower cost Holophone H3 5.1 Surround Sound Recording Microphone. But these units are quite expensive and also quite large. Plus the elements are fixed in size and placement. There are actually many different ways in which to situate the array for the surround sound microphone capsules for varied affects but these Holophone units restrict you to only one array type. Regardless, I have heard good things about these surround mics.
Another single-body option in the Sanken WMS-5 Five-Channel Surround Microphone (another audio company I highly trust from products I use), but alas, like the Holophone option, there is only one capsule array configuration and no internal power option. Compactness is very high, but versatility is low.

The Holophone H2-Pro (left) and the Sanken WMS-5 (right) are single-body surround sound microphones. While this is incredibly convenient, it limits the “canvas” for the surround sound image since all the capsules are fixed. Likewise, both of these microphones require all of their channels (6 and 5 respectively) be fed with 48 volts of phantom power, which is incredibly draining on the recording device’s lifespan if running off battery power.
Knowing single-body solutions weren’t going to work for my particular needs, I researched various multi-microphone options.
Some surround sound microphone arrays use omnidirectional capsules like this $9110 DPA 5006A Surround Microphone Kit (or a mix of omni and cardioid like this $8800 DPA 5006-11A Surround Microphone Kit) but knowing I’d be configuring an array where the mics would be in close proximity to each other, I wanted to keep the capsules hypercardioid. I wanted to minimize overlap in the channels, especially from front to rear. Not just for sound style but to minimize phasing issue.
Knowing I’d want to use individual microphones for greater flexibility, I then slimmed down my choices. One idea was to add more amazingly sounding Neumann KM-184 microphones to the two I already have but even just three more mics would be quite costly. And although they’re nice and compact, they don’t have the hypercardioid polar pattern I was intending on using.
Another idea was going with the industry standard Sennheiser MKH-416 hypercardioid shotgun mic. But again, these too are also costly and quite large. While the length of the 416 isn’t ideal (don’t forget, we have FIVE of these things to carry around!), it also isn’t a deal-breaker. Luckily there are hypercardioid mics that are much smaller if needed.
A close second place for me was the Studio Projects C4 microphones. What I like about them is the removable capsule from omni, to cardioid to hypercardioid (all included in the kit). They also have a -10dB pad switch and a low frequency roll-off switch, both options I also like. And the small body size is perfect. Unfortunately they’re only sold in pairs and I just need 5, which means 1 wouldn’t be used. I’ve also never used these mics, so I don’t know how well they sound or how robust the build quality is.
I ultimately went with the Sennheiser MKE-600 hypercardioid shotgun mics for several reasons. While the 416’s are about $1k each, these 600’s are a fraction of that cost at just over $300 each (while still being in the Sennheiser family, a company I’ve trusted for my audio needs for decades). While they’re not to be compared to the 416’s, they do sound great and give me the flexibility I need at low cost. While they’re a little longer in size than what I was gunning for (about the same length as a 416 actually), I was willing to forego that. One of the main reasons I went with the 600’s is that they can use a single AA battery in place of phantom power (something the 416 cannot do). By using a single AA battery inside each microphone, the entire audio setup (including recorder) can last for many more hours by NOT using phantom power (a huge power draw, especially for FIVE microphones).
My basic setup using 5 identical hypercardioid mics.
The MKE-600 is actually marketed as a “camcorder and video DSLR microphone”. Quite honestly, I almost didn’t buy these microphones because of that marketing nomenclature, which to me reads as “low cost and low quality”. Seriously, who shoots with a “camcorder” anymore? Plus to me, a camcorder/HDSLR camera means lame 1/8th-inch mini-connector. But luckily the MKE-600 mic is indeed XLR. Despite the “camcorder” label, I bit the bullet and ordered these from B&H in hopes they would perform. And indeed, I’m quite happy with the results. I still wish the 600’s were a little smaller, but I have enjoyed the quality from them thus far.
To make the setup work (and in potentially windy environments), I also bought five Sennheiser MZH 600 Windshields (the Auray WSR-2012 windscreens are another lower cost option) and five sets of mounting options (bullheads and conversion screws) to configure these on the 7-point mic mount (more on that in a bit).
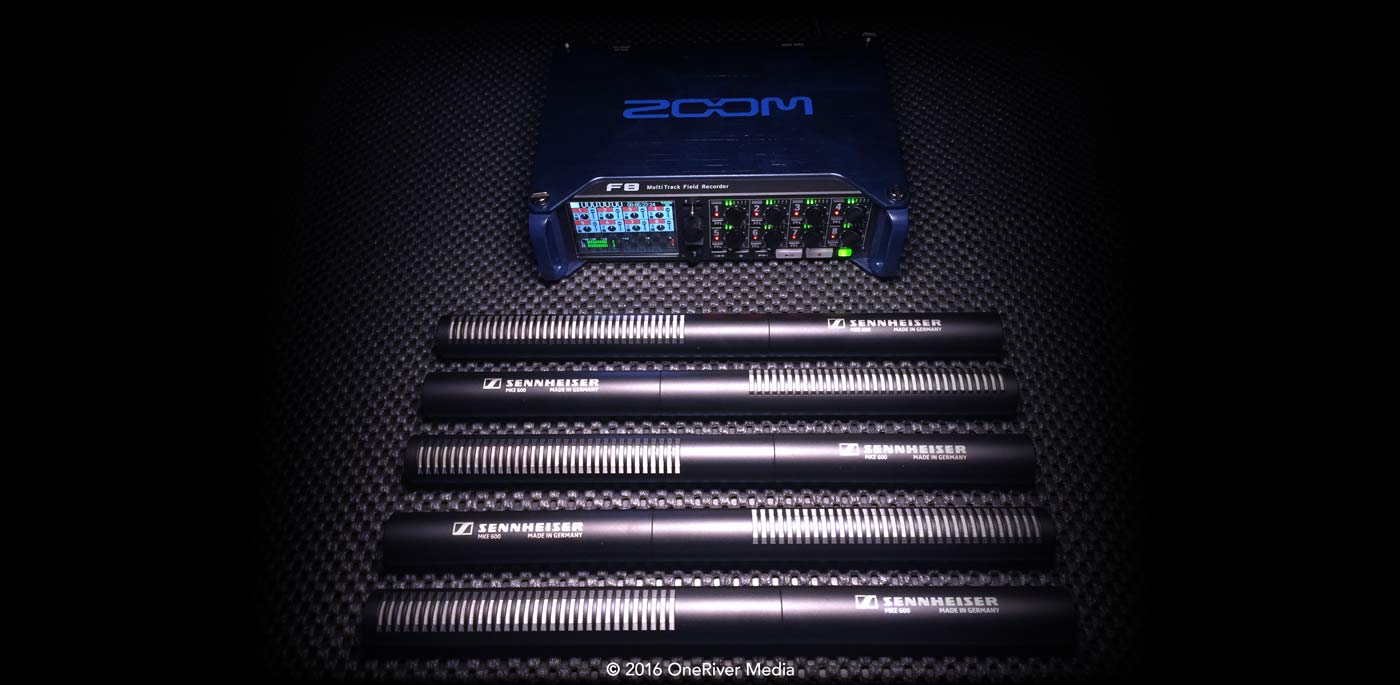
The Sennheiser MKE-600 microphones with the Zoom F8 digital multi-track recorder.
I bought a Whirlwind Medusa Multitrack Series 6-channel XLR snake to connect the mics to the Zoom F8 recorder. While the 6th channel isn’t being used in this setup, if I choose to use a dedicated low frequency microphone (like our AKG D112 or our Electro-Voice RE-20) for high-SPL close proximity capture, I can use that 6th snake channel.
Lastly, I set up my iPhone to be the wireless controller of the Zoom F8 recorder. Most importantly, this allows me to record from afar without having to include my noisy footsteps or brush rustle when starting/stopping the recording. To add, I can individually arm/disarm tracks, adjust input gain, and so much more. This is by far one of the best features of the Zoom F8 for the very surround sound application.
Although I can’t monitor the five channels using a surround sound headphone on the Zoom F8, I can however monitor all five channels in a stereo mix (using my Sony MDR-7506 reference headphones) with the option to solo/mute channels as I wish. I’ve found this to be adequate in the field, as I’m not trying to capture a mix, but rather, capture the individual channels as maximized as possible without getting too close to clipping.
Saving A Buck
While I’ve opted for Sennheiser MKE 600 microphones for all five mics, there’s no reason you can’t go with lower cost microphones. Some lower cost condenser options include (ascending from lowest cost up to $350), MXL 606 Cardioid Microphone ($49 each), Behringer C-4 Cardioid Microphones ($60 PAIR), Behringer C-2 Cardioid Microphones ($60 PAIR), Behringer B-5 Omni/Cardioid Microphone ($70 each), MXL 604 Omni/Cardioid Microphone ($99 each), Samson C02 Supercardioid Microphones ($109 PAIR), MXL 840 Cardioid Microphones ($150 PAIR), Avantone Pro CK-1 Omni/Cardioid/Hypercardioid Microphone ($149 each), MXL V67N Omni/Cardioid Microphone ($150 each), MXL 603 Cardioid Microphones ($199 PAIR), AKG C1000 S Cardioid/Hypercardioid Microphone ($199 each. Note this is a “girthier” mic body than others listed here), Rode NT5 Cardioid Microphone ($219 each), Senal MC24-ES Hypercardioid Microphone ($230 each), Rode NTG1 Supercardioid Microphone ($249 each), Rode NTG2 Supercardiod Microphone ($269 each), Audix M44HC Hypercardioid Microphone ($349 each), Studio Projects C4 Omni/Cardioid/Hypercardioid Microphones ($350 PAIR), sE Electronics sE5 Cardiod Microphones ($399 PAIR).Just remember if using internal battery power in the microphones (as opposed to draw-draining phantom power) is important for your needs and if the microphones you want to buy has this option. For me, it was critical that the microphones have an internal battery option.
Creating The Array Tree
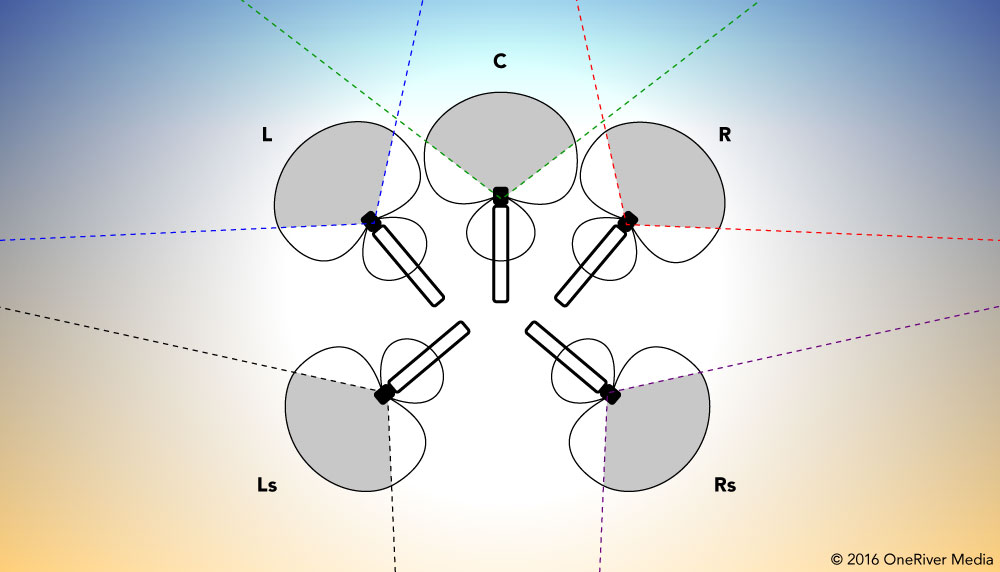
There are many ways you can configure your microphone surround array tree (a topic that can easily consume its own article). Because I’m using my array on remote locations, I wanted to keep a somewhat small footprint, which means the mic placement needs to be tight to one another, which then means the hypercardioid polar patter is a good solution for that (some surround techniques can involve the mics being meters apart to even the width/depth of a performance hall, in which case omni directional polar patterns can be a better option). For my purposes, I used a basic 7-point mic holder and positioned the mics accordingly in a standard star or “Williams Star” array. There are very expensive surround mic holders on the market, but I just didn’t want to pay $875 to $3500 for something like that:Grace Design SB-SUR 5.1 Surround Microphone Bar ($875)
Ambient Recording A-Ray Variable Surround Microphone Support ($1116)
Ambient Recording A-RAY Surround Sound Microphone Support System ($1260)
DPA Microphones S5 Surround/Decca Tree Mount ($2392)
DPA Microphones S5 Surround Five Point Mount ($3055)
So instead, I bought this:
On-Stage MY700 7-Point Microphone Mounting Bar ($14)
While it’s not totally perfect, it’s only $14, literally a huge fraction of the price of true surround sound mic mounts. And it does work, you just have to be a little creative with it. Using small ball heads really make the setup work correctly (and faster). I searched high and low for the smallest and most affordable ball head I could find, while still having an aluminum body to help with strength. I bought the Oben BD-0 Mini Ball Heads and so far they seem to handle the job just fine. Luckily these microphones are extremely lightweight.
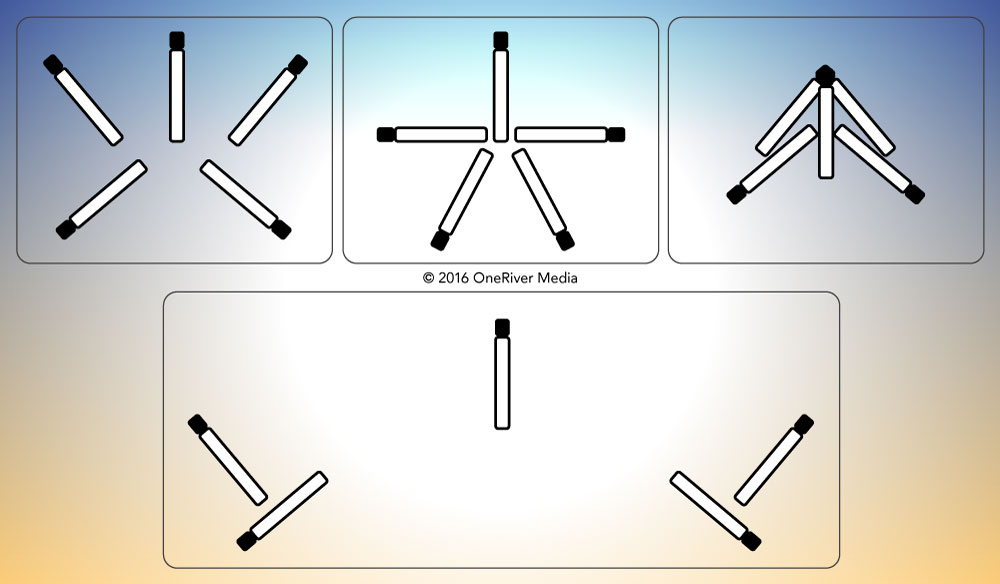
There are infinite variations when positioning a surround array tree. This can be influenced by the microphones, the room/environment size, the sound source type, and so on. Experimentation is key.
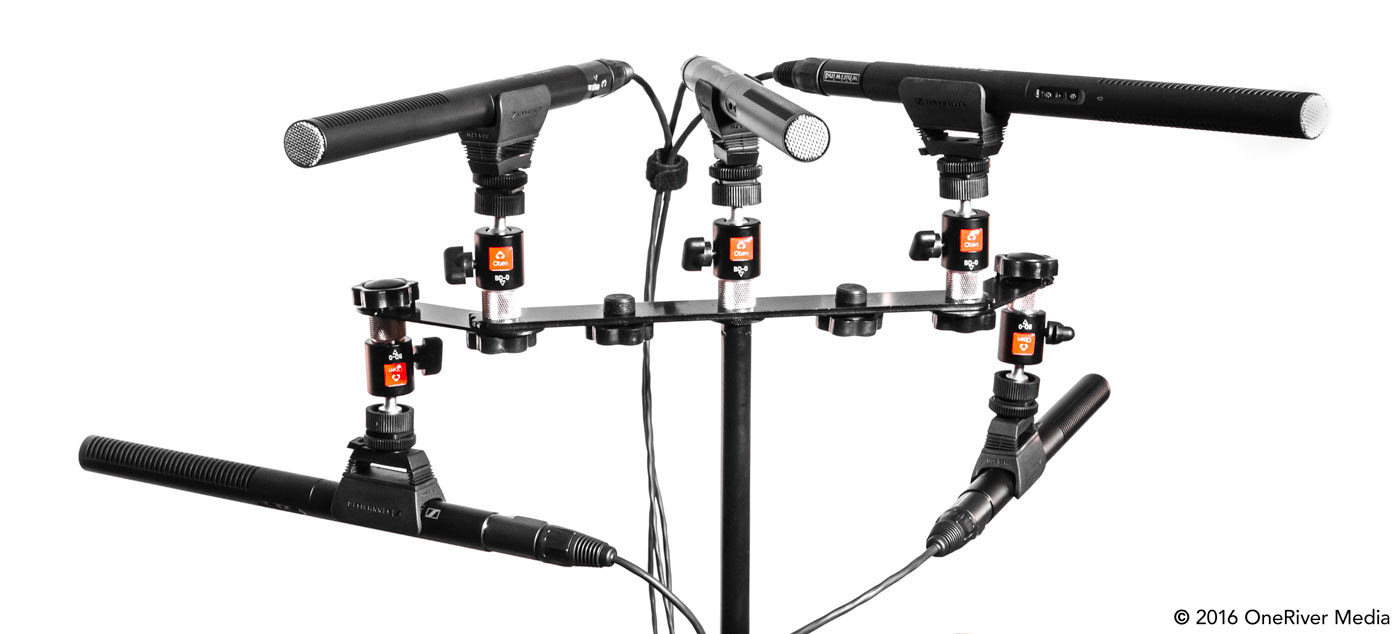
Five Sennheiser MKE 600 microphones comprise my standard 5-point setup. Using the Oben BD-0 Mini Ball Heads makes things MUCH easier to position. I also used five WindTech M-1 5/8″ to 3/8″ adapters to mount the ball heads to the On-Stage MY700 7-Point Microphone Mounting Bar. The Ls/Rs mics are at a lower position to help keep the cables managed a little better.
Mix-N-Match Polar Patterns
Some people like to mix the polar patterns on the array as well, typically with wider polar patterns for the rear mics (cardioid or omni) and more directional polar patterns at the front (cardiod, hypercardioid, supercardioid). For example, you could have cardiod up front and omin in the back, which will give you a more open, farther reaching, overlapping sound. For something more discrete per channel with lower phasing issues, I’m using hypercardioid on all five channels for my compact mounting setup.Do you already have microphones? You may be a step ahead if you want to further save a buck. As long as they are all condenser microphones and you have two pairs of matching microphones and polar patterns (each pair can be different from one another) and a center microphone, then you should try with those first just to experiment. It’s not uncommon to further mix the polar patterns where the front left/right mics are cardioid and the front center is omni (and the rear left/right are cardioid or omni). Just make sure than the L/R mics match and the Ls/Rs mics match at the least.
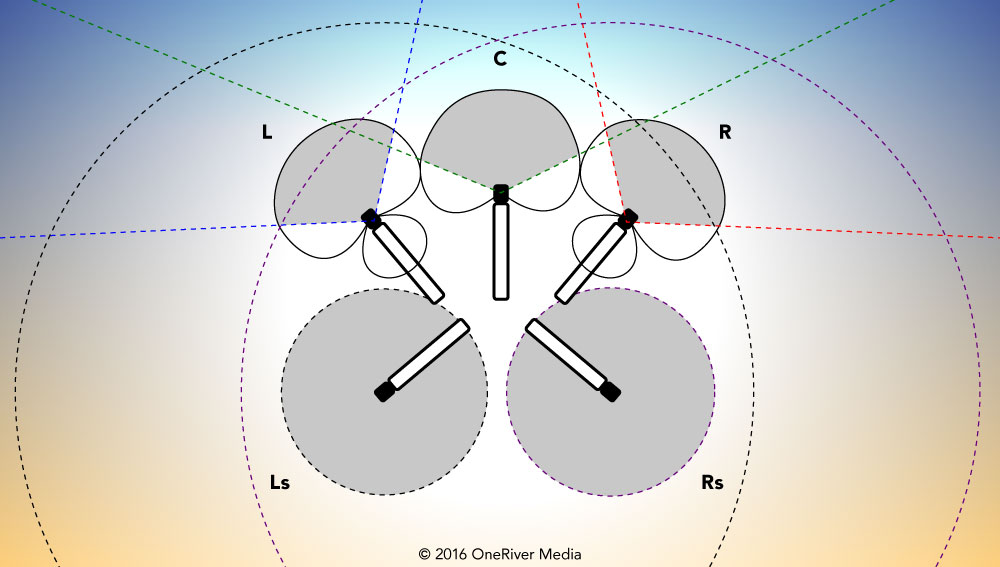
It’s not uncommon to mix polar patterns (and even microphone manufacturers) so long as the L/R mic match and Ls/Rs mics match. Here L/R mics are hypercardioid, C is cardioid, and Ls/Rs are omni.
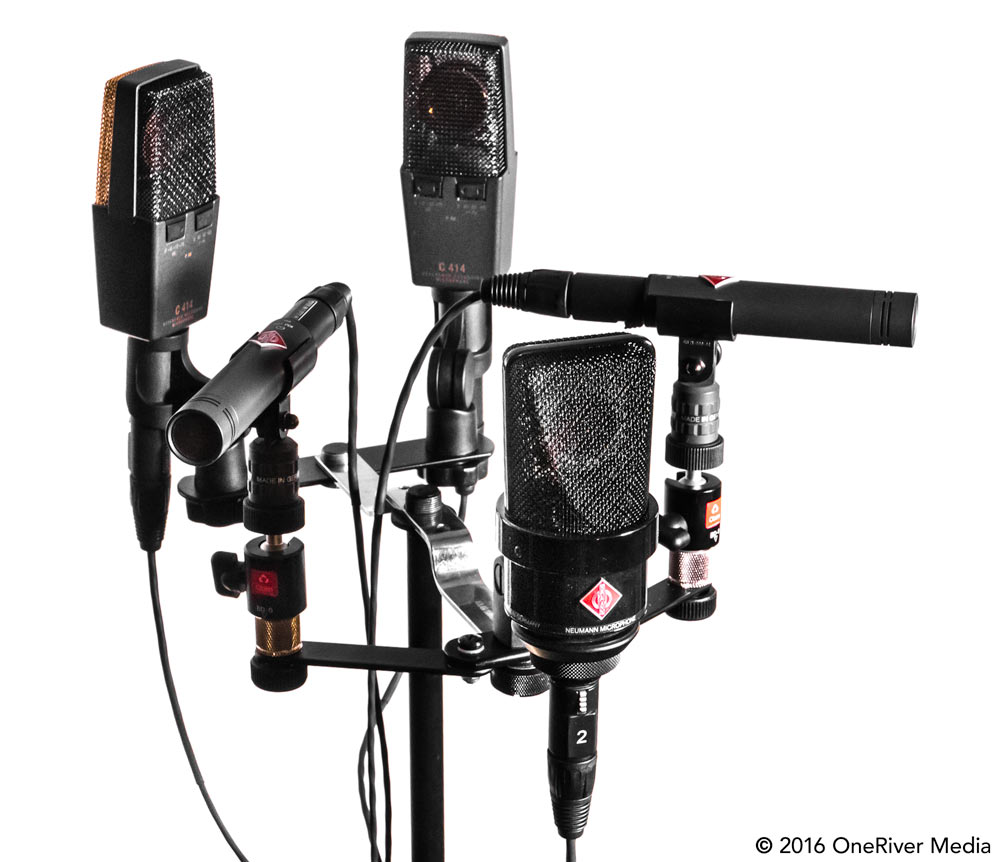
This microphone setup is based on different mics and polar patterns, while stile maintaining exact pairs (in fact, the L/R and Ls/Rs pairs shown are factory matched pairs). All the mics and parts to build this surround tree were used with available mics/parts that we already had. Note that the microphone bar mounts are three bars placed together (one 3-point up front and two 2-point mounts in the middle/back). The ball heads were used on the L/R mics to position the capsules at the same height as the center mic. Mics are as follows: L/R = Neumann KM 184 Matched Pair, C = Neumann TLM 103, Ls/Rs = AKG C414 XL II Matched Pair.
Post-production Surround Sound
While this article is about the affordable tools and options used for surround sound acquisition, I’ll quickly brief on what to do with the captured audio files.With the Zoom F8’s five uncompressed mono WAV files (or six if you also recorded a dedicated LFE channel), you can then take them into any DAW (ProTools HD, Adobe Audition (part of Adobe Creative Cloud suite), Prosonus Studio One, MOTU Digital Performer, etc.) or NLE (Blackmagic DaVinci Resolve, Adobe Premiere, etc.) and start using them as a single surround sound track (essentially a multi-track container within the single track you are controlling). Each host application is different in how you set up the surround sound track (including which tracks go to which channel), but each system is pretty straightforward.

The default settings in Adobe Audition’s export window shows the AC-3 options marked in red.
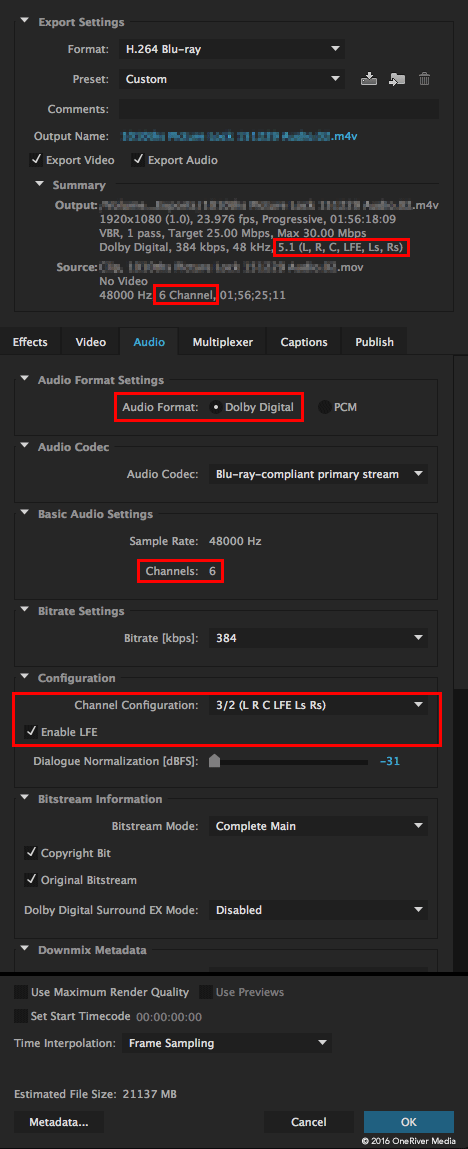
Adobe Media Encoder’s default settings for AC-3 encoding. Click to enlarge.
After you are done with the audio mix project, you then have various options with respect to how the 5.1 surround mix will be encoded, delivered, and used. Many host applications will allow basic surround sound encoding (like AAC or even AC3) within the application at no additional cost (like Adobe Audition and Adobe Media Encoder). Otherwise, if you want advanced AC3, DTS, Dolby E or any other licensed type of surround encoding, you’ll need specific tools for the task, from low cost to high cost bundles (like the $4000 Dolby E set from Neyrinck). Here are some premium solutions of many, again, depending on your encoding and delivery types:
- Minnetonka Audio SurCode DTS-HD Encoder for Compressor ($249)
- Minnetonka Audio SurCode Dolby Digital 5.1 Encoder for Adobe Premiere ($295)
- Minnetonka Audio SurCode Dolby E Encoder AAX/AU/VST plugin ($1495)
- Minnetonka Audio SurCode Dolby E Encoder/Decoder AAX/AU/VST plugin bundle ($2695)
- Neyrinck SoundCode For Dolby Digital 2 plugin ($995)
- Neyrinck SoundCode Dolby E Encoder plugin bundle ($3999)
One suggestion I have is whether you (A) create the surround mix within your NLE of choice or (B) as a dedicated surround mix in a DAW, I recommend exporting the 6-channel mix as an uncompressed (AIFF, WAV, PCM, etc.) 6-track master along with your video track (also at a production format like ProRes). Some applications will import a single audio file with 6 tracks, where others prefer 6 mono files. Once you have that master file(s), then encode it for both audio and video in a separate application that is better situated for compressing audio (and video) for the type of format you’re delivering to.
Again, the purpose of this article is a review of surround sound acquisition tools, not the post-production and encoding process itself (maybe I’ll do a “part 2” with enough interest?). But hopefully this at least gives you some insight into some of the low-cost high-quality options out there that are available. Surround sound production isn’t as daunting as one might think and if you want to take your productions to the next level, then surround sound can help get you there!
I’ve included an audio sample of the Sennheiser MKE-600 surround setup on Soundcloud. The Soundcloud stream is a 2-channel mix but you can click the Soundcloud title to take you to the page to download the original 5.1 AAC file that was uploaded (compressed AAC 5.1 surround, 44.1Khz, 448kbps) to truly hear the spatial separation these Sennheiser microphones pick up so well. All in all, I’m extremely pleased with this setup.
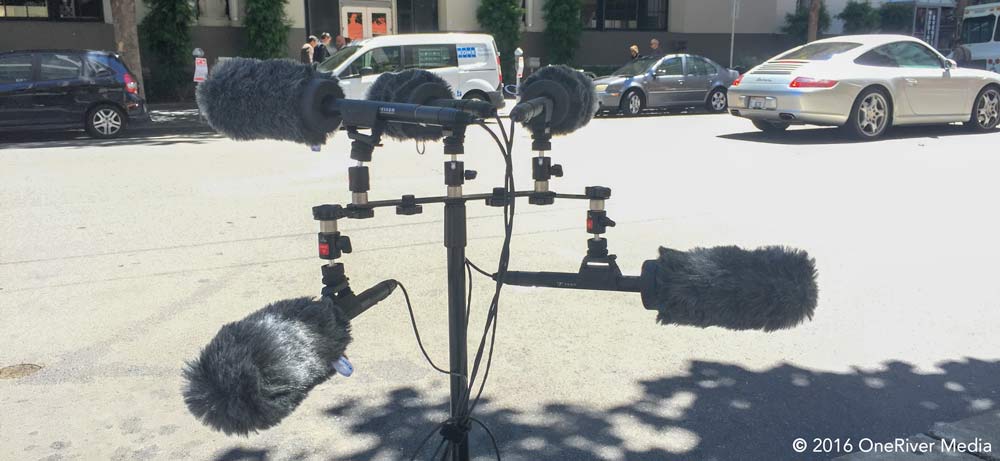
My Sennheiser MKE-600 microphones in action in downtown San Francisco as part of the recording you hear in the Soundcloud sample.
Share this post
About the Author
Article © OneRiver Media, including applicable photographs. All rights reserved. Article and its contents shall not be copied or reprinted without the expressed written approval of OneRiver Media.
FCC Disclaimer - Links from this article might go to affiliate links to B&H and/or Amazon (not much different than the ads you see in YouTube ads, but more focused). Visiting these links (or buying products from the links) cost you nothing additional and may in turn help us pay for the cost of hosting these free articles we write. These articles take an enormous amount of time (in most cases, weeks and months) to research, draft, write, edit, rewrite, and shoot custom photography/video for. In no way do these affiliate links cover the cost of all of that, so any help these links can provide is a huge help to us to continue to offer free content to our readers.