With a year into using DaVinci Resolve as a non-linear editor, Marco Solorio of OneRiver Media shares his thoughts and experiences along that journey. Is DaVinci Resolve truly a viable solution to use as an NLE? Read on.
The public beta version of Blackmagic Design’s DaVinci Resolve as version 12 was released around August of last year. It was at that I point I decided to really see if the software was matured enough to really work as a stand-alone NLE (non-linear editor). For some quick background, I edited video linearly in the 80’s and 90’s and ultimately went the NLE route in the mid-90’s, starting with Premiere, then owning a Media100 system for many years, then FCP 1-7 (where I was a beta tester for part of FCP’s growth), AVID Symphony, and ultimately back to Premiere as our primary NLE. I even dabbled with the //FAST Video Machine VM Studio system for a bit (a hybrid linear/non-linear editor… anyone remember that?). I was even able to hack FCP 1 to work with my Media100 hardware. But I digress (oh the memories). In other words, I’ve been around the NLE block a few times and back.
With Adobe Premiere as our #1 primary NLE (and AVID Symphony as #2), I wanted to really see how DaVinci Resolve would stack up. Part of the interest was to (A) see if Resolve could run smooth, stable, and fast enough to actually be used as a primary NLE and (B) to see if the process of proxies and round-tripping could truly be a thing of the past using Resolve as an NLE.
“I already had roughly 40 to 50 videos edited in Resolve under my belt since Resolve 12 beta”
In my personal experience over the years, the best way to really see the strengths and pitfalls of any software or hardware is to throw real-world, client-paying projects at it. I know this sounds crazy, BUT, if you have a strong backup plan ahead of time, then it’s truly the only way to see if what you’re testing is viable in a professional workflow environment under looming deadlines and client demands.
With all this in mind, the first project I threw at it was a series we shot and edited for the tech company Sumo Logic, under the production agency of Miner Productions (whom we’ve worked with now for roughly 20 years now). We shot the assets down at Big Door Studios in Los Angeles and had a cyc stage painted black for our needs, lit with multiple 10K lights, and shot on the Blackmagic URSA at 80FPS HFR 4K RAW. Oh and did I mention sumo wrestlers?
Because we shot this project in 4K HFR RAW, I would either have to make proxies to edit in Premiere and bounce back into Resolve for final grading OR, I could just simply edit the whole thing in Resolve without the need of creating proxies. Obviously I chose the latter.
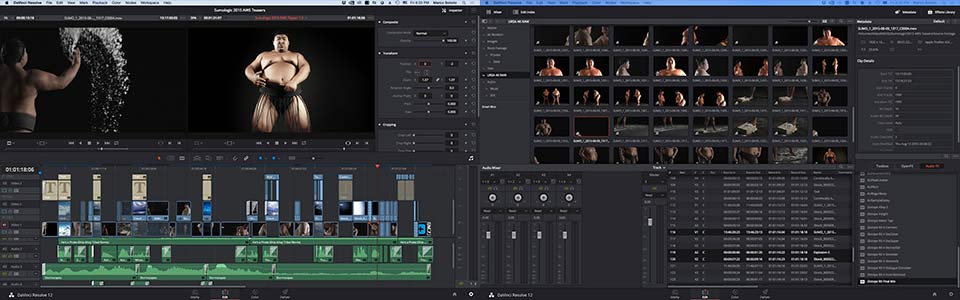
The 2015 Sumo Logic marketing campaign series was the very first commercial project we threw at DaVinci Resolve (version 12 beta) as a dedicated NLE., complete with 4K HFR RAW footage. We never encountered a single crash or hiccup and was, by far, a much more faster workflow than traditional NLE methods… even to this day, over a year later.
Keep in mind that once we brought the 4K HFR RAW footage we shot from L.A. back to the OneRiver Media facility in the San Francisco bay area, my client (Tracey Miner of Miner Productions) was to sit in with me on the initial edits to help sculpt and carve out the videos (a practice he and I commonly do on the vast majority of projects we work on together, as we work very well off each others’ ideas and flow). The point being is that I was using BETA software as a new NLE, with a paying client, literally sitting behind me in the edit suite. If this ship were going to sink, I’d be taking Tracey along for the ride… something I absolutely did not want to happen. But my faith in Resolve as an NLE was strong, so I pulled the trigger.
When it was all said and done, the video series was a hit with both Sumo Logic and Miner Productions. Everyone was happy and Resolve ran like a champ the entire time. Not a single crash during the entire process of the project and this under a beta build.
This project was enough to convince me to continue using Resolve as an NLE. When Resolve 12.5 was released as a public beta earlier this year, I already had roughly 40 to 50 videos edited in Resolve under my belt since Resolve 12 beta from the the first Sumo Logic project. Today, we’re producing an undisclosed nature-based series that is 100% shot in RAW (using Blackmagic cameras), is HFR (high frame rate), is HDR (high dynamic range) and will be delivered in UHD with EVERYTHING being done in DaVinci Resolve Studio from beginning to end (except for the music score). This will dramatically maximize speed, quality, and accuracy.
With Resolve 12.5 being released, the ante was raised exponentially. At this point today, not only is DaVinci Resolve a viable NLE, but it’s actually a VERY competitive NLE in the post-production market. I’m not alone in this thinking, as I know other people that have personally edited (and graded) their feature films entirely in DaVinci Resolve Studio. The recently released Hollywood feature by Universal Pictures, “Jason Bourne,” was online edited and graded in DaVinci Resolve, among the fact that “one of the reels had more than 1,000 cuts”. In short, Resolve is becoming more and more used as a dedicated NLE, something I’m gathering from the industry on a very frequent basis.
Interesting Point
I’d like to point out one other serious factor to validate Resolve as a viable NLE. As a working facility that has a solid NLE workflow in place, the very last thing I’d ever want to intentionally do is disrupt that workflow by introducing a new NLE into the mix. In order for me to make that disruption viable, the NLE in question had better be damn professional and up to the task, even so much as to exceed the current abilities of the existing workflow tools. But here’s the kicker… not only is Resolve not a disruption to the current workflow, Resolve literally eliminates complexities in the existing workflow. Here’s why…No More Proxies
Working with RAW footage natively (compressed or lossless) in the NLE timeline means time, processing, and complexity is eliminated for generating proxies AND conforming them again later on in the post-production pipeline. Granted, you’ll need a fast enough RAID to pull this off, but with RAID prices becoming so incredibly affordable more and more everyday (and faster and faster as well), the excuse for slow disk speeds is becoming a thing of the past.To me, working in RAW today is like working with ProRes of the past. In other words, the process is seamless, fast, and easy. At no point do you feel like you’re working with thousands of Cinema DNG image sequences with adjacent audio files in their respective folders, but rather, you see these as singular files (that include video and audio as one file) within Resolve, just like you’re used to with ProRes files. The only time you would ever see your files as native image sequences would be in the directory structure of your computer itself (the Finder in OSX for example), but within Resolve, they are clean and tidy singular files as one element, the way it should be.
Working in RAW has never been easier and faster for us with the ability to professionally edit and grade, all within DaVinci Resolve.
Media Management
One of the topics I’ve covered through various presentations and workshops I’ve given over the years (even prior to Resolve being a viable NLE) is Resolve’s strength as a media management tool, from the management process itself, media transfers (including check-sum copying of data), media importing, metadata functions, and even internal transcoding (should you require that). At the core, Resolve has excellent media management tools and is especially useful when round-tripping with other software. The process of building dailies, window dubs, or even a quick string-out edit is quick to do with Resolve (with the added benefit of applying preview LUTs or even a quick global preview grade). As these media management tools continue to grow within Resolve, it makes the process of initially building and organizing an edit project better and better.Advanced Edit and Trimming Tools
While version 12 of Resolve came in with a bang for editing and trimming tools, it’s in version 12.5 where we see even more powerful tools for this. The heart of any NLE should be a core set of basic and powerful tools for editing, trimming, slipping, sliding, rippling, replacing, and so on. Resolve delivers with tools that some established NLEs don’t even have. And because you can create custom keyboard shortcuts sets, you can apply quick keys from other NLEs so your muscle memory keeps flowing. Call me a “technomasochist”, but I personally prefer to learn the native keyboard shortcuts of each application I use than applying shortcuts from other applications to it (mostly so I’m not *losing* unique shortcut key operations by importing other ones), but I digress.Audio

As some of you know, my background in audio production/post stems longer than even video editing itself (since the late 1980’s). With that in mind, it is of empirical importance to me that the salt of an NLE’s worth is also weighed in its ability to properly and cohesively handle audio tasks. While we do have a dedicated audio control room with a fully fitted hardware-based ProTools HD system to use for audio projects, I typically prefer to stay within an NLE to handle the audio work for a video project for speed when possible (typically on smaller to mid-sized projects with quick turn-around times).
With Resolve, you have the ability to handle any channel format (mono to multi-channel surround sound). Likewise, you can apply plugin effects on either a per-clip basis or on a per-track basis, which is extremely important (something that ProTools HD itself hasn’t been able to do until the very recent 12.6 upgrade last month, but still only limited to EQ and dynamics—no filters—and only the HD version, and only as a generic plugin based on the ProTools channel strip). Thirdly, you have the ability to quickly create audio stems (aka, “stem mixing”), aside from the standard master mix. And because Resolve supports AU/VST audio plugin formats, you can use all your favorite audio plugins and effects (various Izotope plugins ranks at among the top of many for me). Unfortunately there currently isn’t support for auxiliary tracks or bussing (more about that in a bit). But at a base level for an NLE, the audio platform in Resolve is very capable to save time by not going to a dedicated DAW (digital audio workstation) like ProTools.
If you haven’t heard, Blackmagic Design announced its acquisition of Fairlight (and Ultimatte, yay!) in September during IBC. This is huge news. Fairlight has been in the audio world for decades and has always been one of the top ProTools competitors. With the acquisition, it’s plausible that Blackmagic might add even more audio features into Resolve, like the auxiliary and bussing controls I mentioned. Time will tell, but the future is bright for even more audio power on the horizon from Blackmagic.
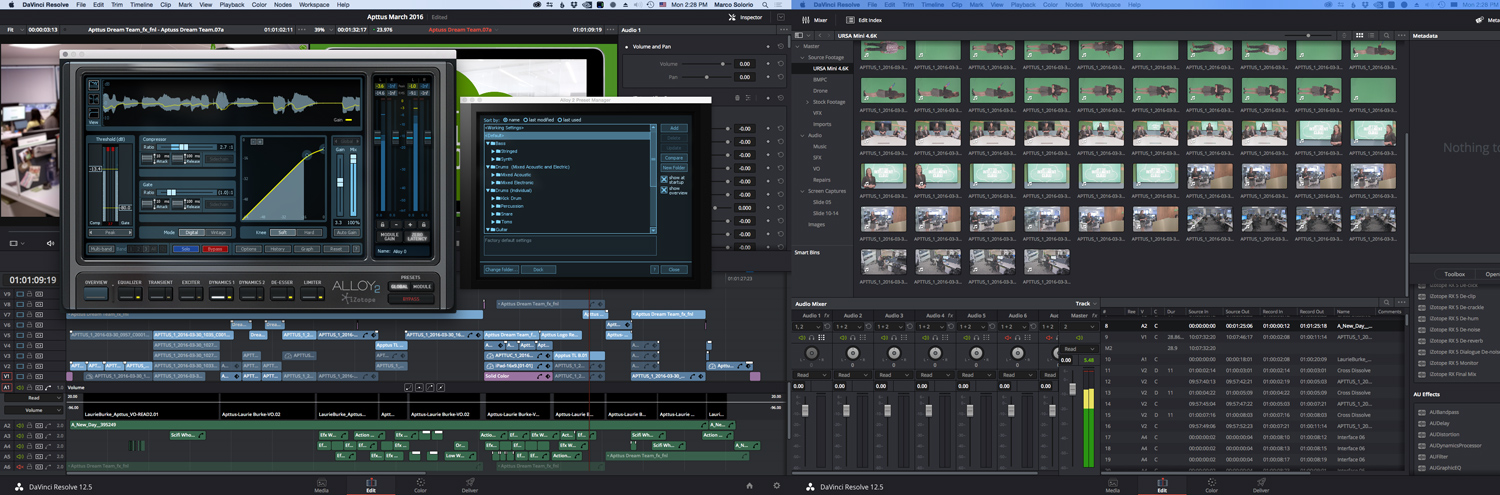
DaVinci Resolve integrates audio plugins seamlessly—at both the track level and clip level; this is key. Shown here is Izotope Alloy 2 (shown on the left screen), one of many plugins we incorporate into our edits.
Editing & Grading
Obviously the power of DaVinci Resolve’s color timing and grading tools are incredibly powerful or Hollywood blockbusters wouldn’t have been using it, literally, for decades now. But having the ability to edit and grade within the same timeline, without having to bounce and render between applications is HUGE. Absolutely H-U-G-E. This to me is the biggest factor for me using Resolve as an NLE, because I literally have the DaVinci Resolve color grading system inside my NLE. To add, I can literally grade footage during the edit if I feel inclined, which can sometimes help get into the emotion of the edit.And it’s not just about grading, it’s also about Resolve’s advanced tracking system, it’s updated noise reduction system, it’s 2D and 3D keying system, it’s new lineup of visual plugins (like lens defocus, lens flare, etc.), and so many other powerful features. Blackmagic Design lists Resolve 12.5 as having over 250 new features (and over 1000 enhancements), when in reality, the total amount is actually higher than that number of features and updates that have been included in this major update. Insanity… in a good way.
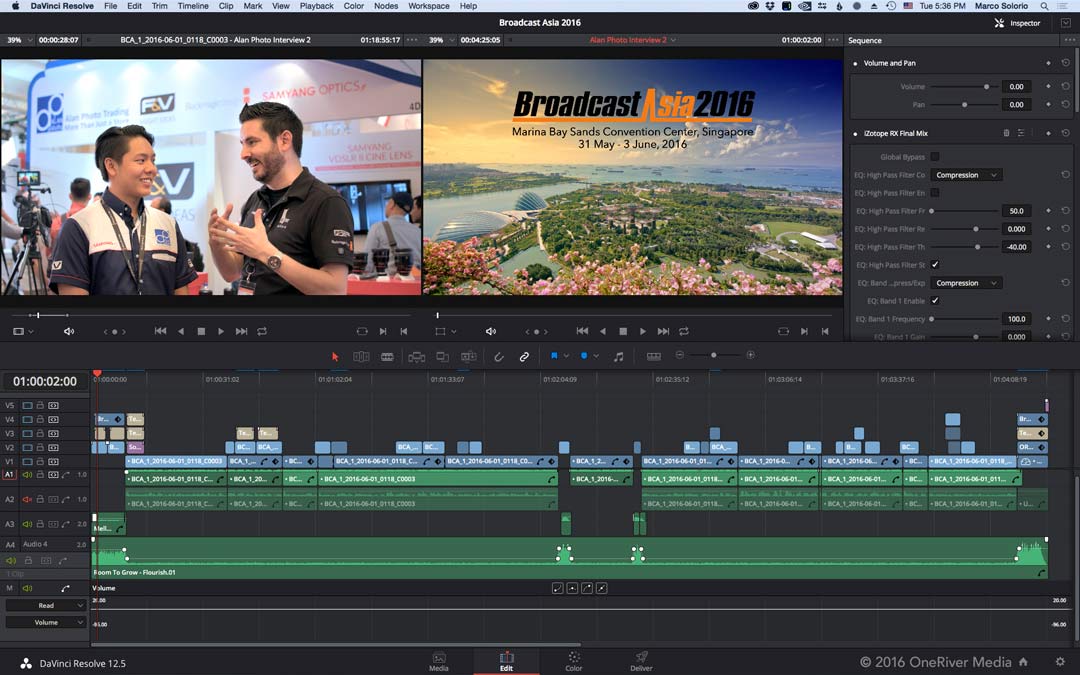
While presenting in Singapore for Broadcast Asia and a special Blackmagic Design event, I took time to also produce interviews (edited and graded in Resolve), which you can view on our YouTube channel.
Advanced Professional Features
The nature-based series I mentioned earlier is being entirely shot in 4.6K resolution (with the URSA Mini 4.6K) in RAW format (4:1 to be exact) with HFR RAW included. This series will be delivered in 4K UHD HDR (High Dynamic Range). Obviously we’ll be doing the entire project within Resolve from start to finish to take advantage of the singular editing and grading ecosystem (except for the music composition itself being created in MOTU Digital Performer). But because we’re delivering this in HDR, we’re working in ACES at 32-bit float, not only for the HDR aspect of it for its primary delivery (including HDR10, Dolby Digital, etc.), but so that we can also export to whichever format we may also need without losing quality in the color-space and DR conversions (Blu-ray SDR, web streaming SDR, etc.). Resolve handles this without skipping a beat and by working in HDR on the get-go (literally from the initial media management phase), we can quickly export final episodes (and their respective promo pieces) to these other formats with speed and ease.Although we’re not working in stereoscopic for this series, full support of that with extended tools is also in Resolve Studio. Multi-cam is another powerful feature within Resolve that shouldn’t be overlooked. All in all, Resolve has a full toolset that easily competes with the other NLEs on the market.
Expanded Performance
Awesome tools are nothing without power and speed as a foundation to support those tools. Resolve can be used under CPU power or GPU power (but does require minimum CPU/GPU requirements). By using the latter, Resolve can grow as you grow. I recently wrote an article on the new Nvidia GTX-1080 GPU card, which is making big waves in the GPU market (along with the new Titan X Gen 2 card). By upgrading GPU cards, you increase Resolve’s processing power without having to upgrade an entire system. And with Resolve Studio, you can stack GPU cards for even more real-time power and speed. I’m currently running a single Nvidia Titan X card (gen 1) and even with that I’m getting real-time performance with 4.6K RAW files under basic nodes (with a fast RAID to help). Throw in noise reduction and I start rendering. But by stacking cards, many of these intensive tasks can easily churn through in real-time. With Nvidia now releasing the new second gen Titan X GPU cards (the most powerful it’s ever delivered), you will see performance stats skyrocket yet again, especially with stacked Titan X cards. But don’t fret; if you’re not in the market for a huge workstation with stacked GPU cards, Resolve still works amazingly well under smaller systems (like Apple iMac desktops). Obviously the more power the better, so if you stick with a smaller computer, using the best GPU in its class is always the wisest decision.
Working on our 2-hour documentary feature film, “10/10ths” (in theaters 2017) in DaVinci Resolve Studio.
Freebird
Get your cigarette lighter out (or glowing mobile phone) because the encore of this showpiece is the fact that Resolve is highly operational software at no cost. While the Resolve “Studio” version adds stereoscopic support, noise reduction, motion blur, multiple-GPU support, multiple user integration (project and timeline), remote grading, extended HDR controls, a few added ResolveFX plugins (grain, flare, lens blur), and a few other bits, the fact is, the free version of Resolve is incredibly powerful (shockingly so). The motion tracker alone (one of the industry’s best) is worth its weight in gold. There is no limitation on nodes, no time expiration, and no limitation on project resolution or length. You can check out the complete list of features for both Resolve Studio and Resolve on the Blackmagic website. For any student, amateur, low budget operation, or even just the curious, there is no reason to not give Resolve a shot (unless you have a computer that does not meet the minimum requirements).To add, Resolve makes for a fantastic satellite-editing scenario where you have one or two Resolve Studio seats and as many satellite editing stations running the free Resolve version, where the power of the Studio version may not be entirely needed (especially for offline editing scenarios).
And if you buy any Blackmagic Design production or cinema based camera (URSA, URSA Mini, Cinema Camera, Production Camera 4K), the $1000 Studio version of Resolve is included for free. I’ve literally never had to pay for the Studio version, thanks to it being included with the cameras I own, and multiple seats at that! I literally keep a spare Resolve Studio dongle in my daily bag in case I need to use Resolve Studio on the go on my MacBook Pro!
Personal confession: When Resolve 12 beta was released last year, I inadvertently downloaded the free version (even though I have full Resolve dongles), I installed it, and used it thick and thin for about A MONTH AND DIDN’T REALIZE IT WAS THE FREE VERSION. One day I realized, “hey why aren’t the noise reduction buttons clickable?” And then it dawned on me that I had installed the free version. That’s how powerful the free version is in comparison to the Studio version, to the point I didn’t even realize I was running the free version for an entire month. I cannot express any more tumultuously how capable, powerful, and professional the free version of DaVinci Resolve truly is.
Fused With Fusion
With the Resolve 12.5 update, there is much greater integration between Resolve and Fusion (a very powerful node-based compositing and effects software package). In short, you can bounce a clip out of Resolve and into Fusion, where you can then work the compositing/effects magic on said clip, then dynamically bounce it back to Resolve without skipping a beat. And like Resolve, Fusion is based on the “Studio” version with the free version still offering a huge punch of features and capabilities. Again, download it and try it out to see how you can expand your visual effects options.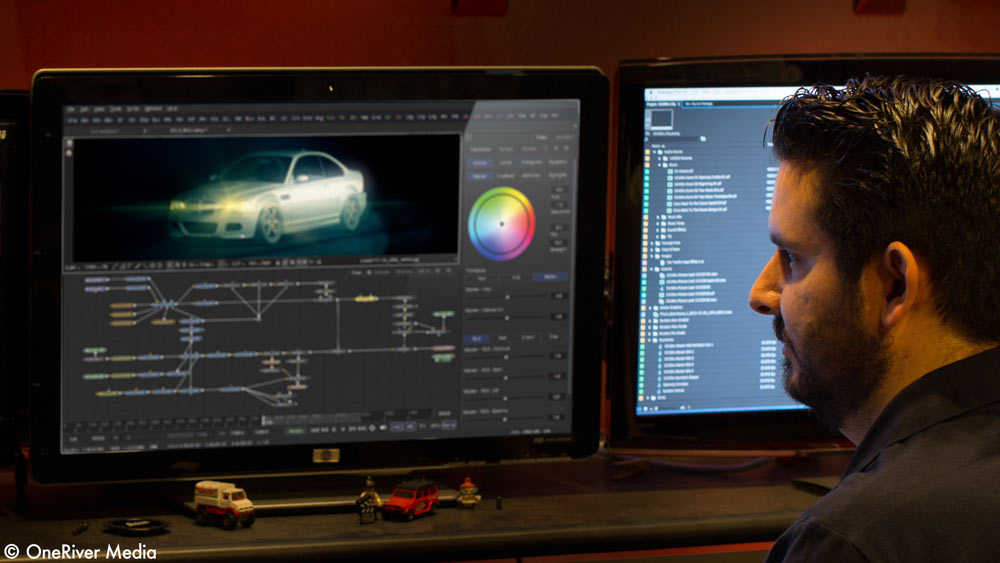
Fusion offers high-end node-based digital compositing in both the Studio and Free version and works dynamically with DaVinci Reolve.
Upgrades
I don’t want to jinx anything here, but ever since Blackmagic Design acquired DaVinci Resolve at version 9, Blackmagic has NOT charged users of the full dongled version with an upgrade fee to major releases (9 to 10, 10 to 11, 11 to 12, and 12 to 12.5). Where just about every software developer on the market charges a minimum to have their users update to a major upgrade release, Blackmagic has not implemented this. Again, I hope I’m not jinxing anything here, but this is pretty amazing.I also know firsthand that Blackmagic Design absolutely does not believe in the monthly payment scheme that so many software companies are adopting these days and that so many of us loathe. I for one applaud Blackmagic on this stance, because as end-user with operational overhead, I can’t stand seeing monthly charges on software I’m required to “rent”. I’m more than happy to buy software, even pay for major upgrades, but monthly “rentals” of software drives me nuts. Again, I cheer Blackmagic not implementing this payment scheme.
Is It Perfect?
There is literally no major software application on the planet that is 100% perfect with no need for improvement or bug fixes. While I’ve been highly enjoying Resolve as my primary NLE for the last year (and surprisingly stable, even under beta), there’s always a short list of feature requests I’d like to see.I like to keep the cache rendering always activated after about 1 second of user inactivity, so basically, it auto-renders continually when I’m not interacting with the interface. But if I make a change to the timeline or make an undo/redo operation, the cache needs to re-render for that section. In short, I’d love to see greater intelligence on cache rendering so fewer things need to re-render. Adobe Premiere and After Effects have excelled greatly in this feature (with what appears to be threaded caching, so even small changes don’t require an entire re-render of a clip and its effects). I’d love to see Resolve do the same. But of course, if you have powerful GPU stacking, the need for rendering in Resolve becomes a bit moot.
While Resolve supports 5.1 surround sound (including plugin support), it could use a little more features in regard to panning and control. As mentioned, maybe we’ll see some Fairlight ingenuity here from its acquisition.
My hope is that a future update to Resolve will include support for auxiliary tracks and buss tracks to further aid in audio control. By implementing these two types of audio tracks, it could truly dismiss the need of working in a dedicated DAW for post-production audio mixing (this coming from a very long-time ProTools user). Auxiliary tracks are great when you want to send one or multiple tracks to the aux track to be used for effects, like reverb, delay, etc., and to even add more filtration specifically to that effect on the aux track (like EQ or compression) without affecting the original tracks that are sending the signals. This adds to a very finite ability of control in the mix while also reducing CPU overhead since a single aux track of plugins are being used, rather than multiple plugins across multiple source tracks.
With audio bussing, you have the ability to add complete effect control to a group of sound sources before going to the master mix output. It’s common to add vocals to a vocal buss (or percussion to a percussion buss, guitars to a guitar buss, etc.) where they can then have a single buss compression filter applied to it to further smooth things out. Like aux tracks, buss tracks can save on CPU resources by using fewer plugins and offer up much more controllability (the big difference is that aux tracks mix with the source tracks, where buss tracks do not mix with the source tracks). Likewise, bussing introduces much more control of stem mixes, even though by nature, Resolve can already do stem output, just currently without level control of those stem outputs. To go even one step further, aux/buss channeling can be used to send monitor mixes back to the musicians when tracking (with supported hardware), but I don’t see Resolve needing this level of audio flexibility as an NLE since that particular task is really suited for audio production, not post-production. But adding aux and buss tracks can really bring the audio side of Resolve to an even higher level of controllability when finishing an edit and its audio mix.
Maybe we’ll see bits of added audio integration into DaVinci Resolve, thanks to the acquisition of Fairlight.
I admit it… I’m an Ultimatte snob. And since the demise of Ultimatte’s software packages (AdvantEdge being the last), it’s always left a hole in my heart for superior chromakey functionality. While there are some OpenFX chromakey plugins out there, none of them have appealed to my needs (a few of them are truly awful). Resolve’s own 2D and 3D keyers are really good, but their core operations are to create clean secondary keys for isolating areas of the image that will then get effected with RGB modifiers. With chromakeying however, the key needs to go a step further in allowing things like hair, fur, smoke, and reflections, to pass through, which Ultimatte excelled in.
But as I very briefly noted, Blackmagic Design has acquired Ultimatte (something I adamantly expressed/wished to the lead DaVinci Resolve team while I was in Singapore a few months ago). When this was announced last month at IBC, I was beyond thrilled. It will be truly amazing to use my favorite chromakeyer of all time again. Chances are we’ll see Ultimatte integrated directly into Resolve (only an assumption on my part at this point) and this will complete my need of staying in Resolve for all NLE tasks 100% of the time.
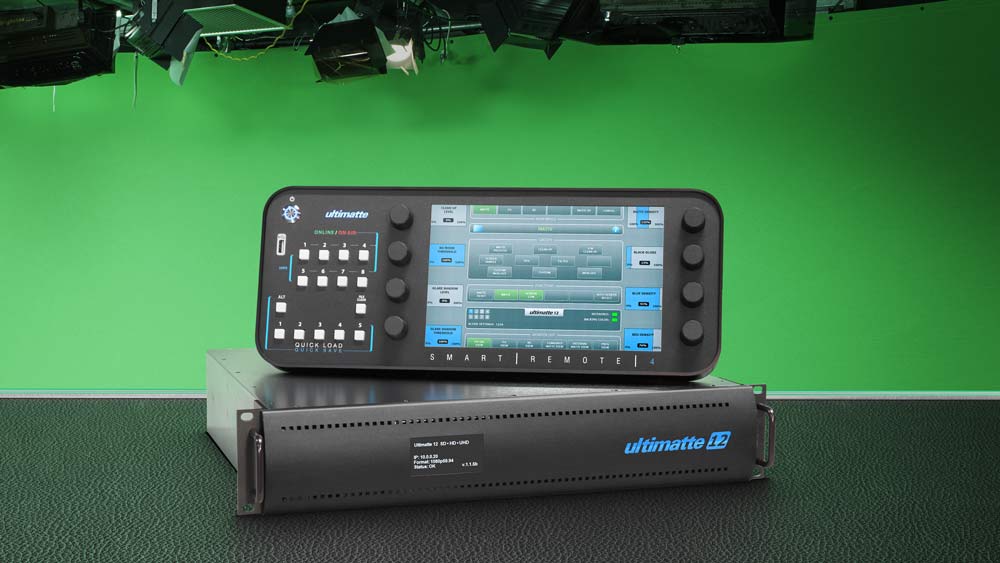
The acquisition of Ultimatte is huge news. Hopefully we’ll see direct integration into DaVinci Resolve. Seems extremely plausible.
Conclusion
While I’d love to see a few functionality updates to Resolve, as mentioned above, the fact remains that Resolve continues to be my primary NLE of choice after over a year of rolling the dice on it as an NLE. The ability to edit and grade within the same timeline is absolutely huge. And not just grade, but “DaVinci Resolve” grade. Combining that with its vast plugin support (video and audio) is another bonus. And with RAW support literally feeling like I’m working with ProRes files, is absolutely killer. There’s a ton of other features I love in Resolve that I didn’t include in this write up (among the 250+ feature additions to the 12.5 update) and it’s safe to say that I’ve been enjoying the ride so far. And having actually visited the super secret unmarked facility in Singapore where DaVinci Resolve is developed, literally by scholars, PhD’ers, and in my mind, magical software engineering wizards, I can safely say that these guys aren’t resting on their laurels, with even more innovation and updates coming to Resolve (and if history repeats itself, continually at no cost to existing end-users). All in all, Resolve has positively been a pivotal shift in both my workflow and within the industry itself… all for good measure. If you haven’t given Resolve a go-around as an NLE, I’d implore you to give it shot. The attributes are truly beneficial or I wouldn’t have edited dozens and dozens of client videos on it thus far! In short, DaVinci Resolve is truly a powerhouse.Share this post
About the Author
Article © OneRiver Media, including applicable photographs. All rights reserved. Article and its contents shall not be copied or reprinted without the expressed written approval of OneRiver Media.
FCC Disclaimer - Links from this article might go to affiliate links to B&H and/or Amazon (not much different than the ads you see in YouTube ads, but more focused). Visiting these links (or buying products from the links) cost you nothing additional and may in turn help us pay for the cost of hosting these free articles we write. These articles take an enormous amount of time (in most cases, weeks and months) to research, draft, write, edit, rewrite, and shoot custom photography/video for. In no way do these affiliate links cover the cost of all of that, so any help these links can provide is a huge help to us to continue to offer free content to our readers.
Comments 33
Interesting article. I always recommend Resolve to anybody about to transition from stills to video or for those who are approaching video editing for the first time but I also warn of Resolve’s considerable hardware requirements to become an optimum post environment. (eg: Decklink with correctly calibrated SDI ‘video’ monitor as a minimum requirement)
I personally still prefer to use an NLE that I’m thoroughly fluent with and one that works with a dedicated hardware control surface (Lightworks in my case) but I’ve long been a fan of eliminating ’round tripping’ completely by exporting only an AAF/EDL/XML and finishing the programme in Resolve. I have even mapped my X-Keys 68 Jog/Shuttle with identical Transport Controls for both Lightworks and Resolve.
I think for those working in RAW formats and 4K and higher, as the article concludes, Resolve offers a complete solution with the proviso that you are prepared to equip the basic software it with a considerable amount of additional hardware.
Author
Hi Craig, thanks for the comment. I think the perceived need for Resolve’s hardware requirements is sometimes skewed at times, only because if you want serious real-time effects on things like noise reduction, then yes, beefy hardware is definitely required. But I can definitely run Resolve on my MacBook Pro (I’m definitely not alone in this). I also know people that are running it on their iMacs. I like that that the option to grow into hardware is there. Likewise, you do not need Decklink to use Resolve from a base point. With regard to using Resolve, you mentioned, “Decklink with correctly calibrated SDI ‘video’ monitor as a minimum requirement” is true for *any* NLE system IMO. Whether I use Premiere, Avid, Resolve, or even way back in FCP 1-7 days, I always used SDI (or YUV component) output to a properly calibrated broadcast monitor. Anyone working professionally should be doing this anyway, not just with Resolve. Just my professional opinion though. But for the dabbler/hobbyist/etc., they can go out via built-in HDMI and the like (or in many cases as I’ve seen, nothing at all and simply use Resolve’s UI monitor).
I agree Marco. I initially installed Resolve a couple of years ago as a client had brought in a 10bit IPS monitor (designed for pre-press soft proofing) but one which could be accurately calibrated to Rec.709. However with this new monitor connected to my PC workstation running Lightworks via Display Port from a Quadro card, I was disappointed with the image quality of my pictures. I needed to be sure that the image was an accurate representation of what I had shot so I bought the BMD Mini-Monitor and configured it with Resolve as Lightworks would only accept a Decklink I/O card. Unfortunately, the HDMI output from the mini-monitor was also disappointing. There were crushed blacks, noise and aliasing present which was not the picture I saw when connecting the camera directly to an sRGB monitor.
Next, I bought a second hand ‘HD Link’ box which converts SDI to Display Port and offers a 10bit 4:4:4 ‘video’ signal conversion for ‘computer’ monitors. Voila! What a difference. Suddenly even 8bit images looked spectacular – clean and sharp with none of the above mentioned issues. I have since upgraded to the latest 12G Decklink SDI 4K Pro card as it is recognised by both Lightworks and Resolve and it will output a 4K 10bit 4:4:4 image at up to 60P framerate. Although my calibrated monitor is native HD, the new SDI Pro card offers real time hardware downscale from 4K to HD on SDI #2 which we run to the grading monitor via the DH Link converter whilst the Decklink’s SDI #1 output goes directly to our Sony 55″ X9005B 4K TV ‘client’ monitor through a 12G SDI to HDMI 2.0 converter. This is a fantastic setup with a fast 12G SDI ‘foundation’ as I can hire in a calibrated FSI monitor when more critical monitoring is required.
Our local High Schools is considering dropping Premier completely and installing one full blown Resolve grading system with Resolve free installed on all the student macs and laptops.
“… was entirely edited and graded in DaVinci Resolve…”
The press release only states the film was confirmed and graded in Resolve. It would be very surprising if a feature of this magnitude and complexity was creatively offlined in Resolve. If I had to guess — I’d bet it was cut on Media Composer, or secondarily Premier.
Author
Hi Blake. Thanks for pointing that out. In conversations a few months ago, it sounded like the edit was performed within Resolve itself, but the press release does seem to make it reflect more that the online edit was performed, among its comments when they were dealing with the fact that “one of the reels had more than 1,000 cuts”. Anyway, I’ve updated the part in the article to reflect it. Thanks.
Thanks Marco. I do want to mention that I enjoyed the article. I too am making the transition to Resolve — having come from a couple of decades on Avid Media Composer / Symphony. Every NLE has it strengths and weaknesses, and Resolve is clearly in ‘catch-up mode’. However, they are doing it quickly and aggressively, and their acquisitions suggest an exciting future. Regarding the possible influence of the Fairlight acquisition on Resolve, it is worth reading Grant’s thoughts as expressed in the Blackmagic Design announcement:
““Fairlight creates the world’s most powerful digital audio software and hardware for video production,” said Grant Petty, Blackmagic Design CEO. “The exciting part about this acquisition is that it will add incredibly high end professional audio technology to Blackmagic Design’s amazing video products. ”
Hard to know if Grant is referring to hardware products or software products. However, I have to imagine Resolve will benefit more from Fairlight — than Avid ever allowed Media Composer to benefit from ProTools.
Announcement Link: https://www.blackmagicdesign.com/media/release/20160909-02
Author
Glad you enjoyed the article, Blake. Appreciated. I agree, BMD is in catch-up mode, but are definitely doing it quickly and aggressively, as you mention. Like no other NLE company that’s I’ve ever seen, which is impressive. Yeah, my hope is that they’ll add Fairlight “guts” to many of their products, in both hardware and software. I think the next NAB will be very interesting to see what these guys unveil. Fun times!
Thanks for the in-depth article.
Author
Thanks for saying so!
Interesting thoughts.
Been trying Resolve as the only editor myself and I find that it is pretty good, but still lacks in some areas. For example, I really miss a Premiere-like trim window. More media organizing features would be nice: more ways to do pre-selects, to order bins. Timelines in tabs would be good, so that you can copy easier from a timeline to timeline using one of the timelines as a selects reel; or even better: to have two timelines simultaneously open (ala Premiere).
When editing DNG raw Resolve gets extra points, due to the excellent DNG handling features. It is really a joy to be able to edit straight from the raw sequences, going at wish from coloring to editing and the other way around.
Author
Hi Dean. Thanks for your input. Have you tried the advanced trimming tools in Resolve? You have to activate it in the interface to use them. They’re quite powerful. I’d personally like to see tabbed timelines as well, but it hasn’t been a deal-breaker for me, just something I’m used to in Premiere. But have you tried the various bin modes? You have regular bins, smart bins, and power bins, which can be used across any project you open. These different types of bins can be quite powerful from sequence to sequence and project to project. You should check out the stuff from my friends Patrick Inhofer & Robbie Carman (Mixing Light) and Alexis Van Hurkman (Ripple Training) to seriously get into the editorial features of Resolve. These guys really break it down with features and tips that aren’t readily obvious from the manuals and such. With 250 new features and over 1000 enhancements, it’s very easy to overlook some of these new powerful tools in Resolve, myself included!!! And I totally agree… the RAW workflow in Resolve is truly unmatched. I’m seriously loving it over here! Cheers!
great article.
Hi Marco,
The article I’ve been waiting for. Thank you! I’m using a 2011 Macbook Pro and going through Alex VH recommendations(render cache, proxies, optimized media, etc) for smoothest playback is not going to well(mostly ProRes HD footage) on my MBP(16GB ram, AMD 6770 1GB gpu). Was looking forward to the new MBP but seeing it is once again under spec and over priced, I am now considering a PC laptop as mobility is important for myself. Unless an external Bizon Box is an option with adding a GTX 1080?
Does Resolve equally benefit from AMD and Nvidia GPU’s? I hear there is an upcoming GTX 1080ti 12GB. Excuse my ignorance in gpu’s but will this be a mobile option or a desktop gpu?
I’m currently monitoring component out to my PVM20L5. Since you’re working with 4K footage, how are you monitoring? Is a 4K monitor necessary or will 1080 suffice? Thanks for your feedback!
Author
Thanks for the kind words regarding my article, Joe. I’m on a slightly beefier MBP than what you described, but am able to work in ProRes/RAW just fine. A big part of the puzzle though is disk speed… what are you using for that?
On the PC laptop side, there is one company (I forget which) that has a GTX 1080 built into it. Sounds cool but I haven’t researched deep into it. There’s quite a number of super powerful PC laptops though. My friend Gary Adcock in Chicago mentioned a couple of his favorites on one of my threads: TB3 enabled PC laptops from Dell (the ultra thin Precision line), his monster Lenovo P70 with 64GB RAM and 4TB of SSDs, Xrite color calibration built in for the UHD screen and dual TB3 ports.
You’ll only need 4K/UHD if your workflow and delivery demand it. Otherwise I’d stick with HD. If you want affordable 4K monitoring, the consumer LG OLED UHD HDR units are popular for those stepping into 4K *and* HDR. And if you go with a Flanders Scientific Box I/O, you can really get the calibration in tune.
Note that the new 12G BMD Terenex SDI to HDMI 2.0 converter can also help achieve accurate colour calibration with consumer 4K TV displays as it can load 3D LUTs.
Fantastic article, Marco. Thanks for writing it.
I’ve been using Resolve as my NLE for the past several projects, mainly because I’m primarily a Colorist and hate the whole round tripping workflow. I absolutely love being able to edit and grade my projects in the same software as I’m using to do the grade. That said, I will never be able to consider Resolve’s editor as a professional NLE until they support third party jog and shuttle controllers, like the Avid Transport. I’ve been editing long enough to have come to depend on my transport device. It’s part of my tool set and I’d be lost without it, as would many if not most digital editors out there. Why won’t Blackmagic support these devices? Do they really think that doing so would harm the bottom line of their $30K Resolve panel? It’s kind of sad, actually, because I really like the Resolve NLE and could see myself switching to it permanently.
Author
Thanks for the kind words, Patrick. I agree, I too am tired of round-tripping. It feels so archaic at this point. We still do it when needed, but I definitely prefer editing in Resolve so we can do away with round-tripping when given the choice. Resolve does support jog shuttles controllers. We use the Tangent Element panels and it allows (amongst many other things, jog/shuttle of clips and timeline). We mostly use it for the grading spheres and dials though. The rotary encoders are nice too. I think the Avid Artist series allows for jug/shuttle control as well. JLCooper also has jog/shuttle control surface systems that work with Resolve. In short, there are many ways to have jog/shuttle support in Resolve!
Here’s how the $250 X-Keys Jog/Shuttle works with Lightworks and Resolve. The X-Keys also maps ‘mouse clicks’ which many other 3rd party controllers will not I’m currently writing custom scripts so I can access all of Resolve’s ‘user settings’ such as Contrast, Pivot, Saturation, Hue, Lum Mix, etc. with a simple, two key toggle!
https://www.youtube.com/watch?v=EWDeGHV8-fc
Author
That’s awesome, Craig! Love the backlit keys too. It would look/work nicely with my EditorsKeys backlit keyboard and my Tangent Element panel! I’ll have to look into that. Thanks for sharing.
We’re tried using the Jog wheel to access all of Resolve’s presets too with a ‘press and hold’ option. eg: Press/Hold Saturation, rotate the jog wheel. This will work but some really heavy programming is required so as the X-Keys already maps ‘mouse clicks’ into any key, it’s relatively easy to set a ‘Saturation’ key for example, then toggle up/down to adjust then double click Saturation to reset. I virtually never need to use a ‘slow and agricultural Mouse’ at all!
Craig,
Can you clarify: Are you actually writing custom scripts that somehow interface with Resolve internally or are you using the simple coordinate-mapping style, front end interface, way most people seem to use with X-Keys?
One of my big beefs with Resolve has been the lack of customizability of third-party panels. It’s an absolute must. I keep telling Blackmagic if they were to make this one of the differentiators between the free and the “Studio” version they’d have a lot more people actually buying licenses. I also think in a lot of situations once you can afford/need the panels you’re at the point of needing to be paying for the software.
Yes, that’s true, that Resolve can be mapped to the jog/shuttle controls. I currently have Resolve mapped to my Avid Transport. Unfortunately, the Jog movement and precision leave a lot to be desired. I’ve mapped the arrow keys to this control, and I still find the jog control unusable. It either overshoots or undershoots (is too fast or too slow after adjusting the speed in the EU control panel) and I’m done with it, unless there is another way. Still hoping Resolve decides to build in some actual support for these third party controllers.
Author
Have you tried the Tangent controllers? Or the JL Cooper controllers? Definitely worth trying out in person, if not at NAB, at major retailers like B&H and the like. Not sure it’s BMD’s issue though, since the protocols are open by BMD for these listed third party manufactures to design their own control surfaces to work with Resolve. I do like my Tangent control panel, FWIW.
I know from speaking with Tangent directly that they very much put the blame on BlackMagic for not giving them an appropriate level of access. It’s end-user customization that I most desire. Even just a couple Fn-style buttons which activate different things when pressed in different combinations could mitigate so much wasteful menu navigating. And even just two of such buttons which alter the effect of the other controls when pressed allow for a decent amount of control since you have additional permutations with every button you add.
Hi Pat!
And this is why I still prefer to edit in Lightworks and export an AAF to finish in Resolve. If BMD ever decides to address their lousy Jog/Shuttle transport, only then will I consider editing in Resolve!
PS: IMO, Resolve’s new edit ‘Trim’ commands are still nowhere as fast or as user friendly as those in Lightworks. As Lightworks was designed around a hardware panel from Day 1 (ie: The Console) many edit trim features are only active with a USB Jog/Shuttle connected (any USB jog/Shuttle, not just the Console) so unfortunately, these features cannot be readily evaluated in the trial with just a mouse.
I completely agree!
Great write up. I’ve been using Resolve studio for a year now as an editor and absolutely love it. Coming from FCP 7, The entire resolve experience feels like a completely professional product aimed at technically sophisticated users, as opposed to the trend of making things useable for content creators that need to edit. The latest version or two seems to work better with the Element jog wheel but maybe I’m imagining it.
The one thing I’m missing is Makie control surface support for mixing. I too usually have mix in the edit and did some great mixes in FCP 7.
Obviously there are many areas of improvement BMD is working on and there will always be some feature one of the other NLE’s has that someone will say DV is missing. I’ve told some educators about it and I think BMD should make a huge push to get it into schools. The price is right for students and the skills will translate to any other NLE and grading system.
Author
Great comments, Richard. Yeah, Resolve is on a whole new level of editing. It’s fantastic to have DaVinci grading and pro editing all in one app. We’ve saved so much time in our workflows. I haven’t yet tried various audio control surfaces with Resolve. With Blackmagic’s acquisition of Fairlight, it’ll be interesting to see if they implement audio control surface technology into Resolve. But at the least, I too would love to see more compatibility with existing low cost audio control surfaces. And yeah, you can’t beat free for a price tag for learning Resolve on. I think BMD does a little pushing in the schools for Resolve but I’m not sure to what extent. I expect to see more of it though.
Resolve already supports my OxygenTec ProPanel and as venerated Colorist Warren Eagle states in his YT video, it is a very professional panel although hardly ‘portable’ as it weighs in at 6.5kg! Coupled with an X-Keys 68 Jog/Shuttle, it make Resolve a very sophisticated workstation for editing and grading: https://www.youtube.com/watch?v=EWDeGHV8-fc&t=1s
Author
The OxygenTen panel is nice! But Richard’s comment was in regards to support in audio control surfaces (flying faders, encoders for pan, buttons for mute, solo, track select, etc.).
Hello! Thank you for the wonderful article. My wife and I are just now starting out in vlogging and blogging and want to begin recording, editing and posting short videos soon. We are quickly collecting the gear and have been learning the ins and outs of html, blogging, etc.
Would you recommend something as professional and comprehensive as this suite for a rank beginner? We have not yet edited anything! If this will be far too complicate to jump in and learn, what would you recommend instead?
Thank you in advance for any advice!
Corey and Angelika Booher
Terrific article Marco. For all the reasons you mentioned about the pain or round tripping in and out of applications as well my editing style of mixing the online and offline parts of the edit especially during the grade as part of the creative process, I’ve been using the Resolve on and off for most of my projects now. There is one hole though that I am having trouble filling and that’s how to make selects within clips. FCPX has a feature where you can make select multiple parts of the one clip and mark as favourites. This is especially useful when editing long streams of dialogue. While you can make your selects and drop them in a timeline you can’t group these clips into collections before you get to dropping them in the timeline. I just wonder how you do it.
Again, well thought out article. Thanks.
Author
Hi Randy (sorry for the delay… just realized all site-wide comments were disabled due to a bug). Thank you for the nice comment! Resolve 12.5 doesn’t exactly have that as far as I know (I could be wrong), but the new version 14 has something similar where you can, in real-time, add marker points to the source clip and use that for other tasks, like 4-point editing and such. One way I’ve worked with long dialog clips that need breaking up is basically creating sub clips so they have their own clips/thumbnails in their respective bins.